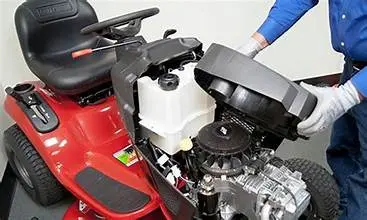
Maintaining a well-functioning carburetor is crucial for the optimal performance of your Craftsman lawn mower. Over time, dirt, debris, and old fuel can clog the carburetor, leading to poor engine performance and difficulties in starting.
In this comprehensive guide, we’ll walk you through the step-by-step process of cleaning the carburetor on your Craftsman lawn mower to keep it running smoothly.
Gather the Necessary Tools and Materials
Before diving into the carburetor cleaning process, make sure you have all the tools and materials required for the job. Here’s a quick checklist:
- Screwdriver
- Socket set
- Carburetor cleaner
- Compressed air
- Safety gloves
- Safety glasses
- Replacement gaskets (if needed)
Having these items on hand will ensure a smooth and efficient cleaning process.
Locate and Remove the Carburetor
-
Locate the Carburetor
On your Craftsman lawn mower, the carburetor is typically situated near the air filter housing. Refer to your mower’s manual to pinpoint its exact location.
-
Disconnect the Spark Plug
For safety reasons, always disconnect the spark plug before working on any part of the lawn mower. This prevents accidental starts and ensures your safety during the cleaning process.
-
Remove the Air Filter Housing
Use a screwdriver or socket set to remove the screws securing the air filter housing. Once removed, set the housing aside.
-
Disconnect Fuel Lines
Carefully disconnect any fuel lines connected to the carburetor. Be prepared for some fuel spillage, so have a container or absorbent material ready.
-
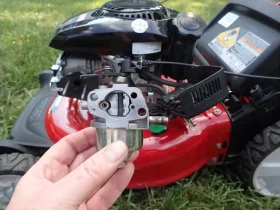
Remove the Carburetor
Loosen the bolts or screws holding the carburetor in place. Gently lift the carburetor out of its position, taking note of any linkages or connections that may need to be detached.
Disassemble the Carburetor
-
Take Note of Linkages and Connections
Before disassembling the carburetor, take clear pictures or make notes of how the linkages and connections are set up. This will aid in reassembly later.
-
Remove the Bowl
Most carburetors have a bowl at the bottom that collects sediment and debris. Unscrew the bowl, allowing any residual fuel and debris to drain out.
-
Clean the Bowl
Use compressed air to blow out any remaining debris in the bowl. Wipe it clean with a cloth and inspect the bowl gasket for wear or damage.
-
Remove the Float and Needle
Carefully detach the float and needle from the carburetor. Inspect these components for any signs of wear or damage.
Clean the Carburetor Components
-
Spray Carburetor Cleaner
Liberally spray carburetor cleaner on all the components, including the bowl, float, needle, jets, and any other visible parts. Ensure that the cleaner reaches all crevices to dissolve built-up deposits.
-
Use Compressed Air
Blow out the cleaner and loosened debris using compressed air. This helps ensure a thorough cleaning of the intricate passages within the carburetor.
-
Inspect Jets and Passages
Carefully inspect the jets and passages for any remaining blockages. Use a small wire or needle to gently clear any stubborn debris.
Reassemble the Carburetor
-
Reattach the Float and Needle
Carefully reattach the float and needle to their original positions. Ensure that they move freely and are not hindered by any debris.
-
Reinstall the Bowl
Screw the cleaned bowl back onto the carburetor. Tighten it securely, but be cautious not to overtighten and risk damaging the gasket.
-
Reconnect Fuel Lines
Reconnect any fuel lines that were detached during the disassembly process. Ensure all connections are tight and secure.
-
Reinstall the Carburetor
Gently place the carburetor back into its original position. Reattach any linkages and secure the bolts or screws to hold it in place.
Final Steps
-
Reattach the Air Filter Housing
Securely screw the air filter housing back in place. Ensure that all screws are tightened to prevent any air leaks.
-
Reconnect the Spark Plug
With the carburetor cleaned and reinstalled, reconnect the spark plug to restore power to the engine.
-
Check for Leaks
Before starting the lawn mower, carefully inspect for any fuel leaks around the carburetor. Address any issues immediately.
Start the Lawn Mower and Test
-
Prime the Engine
If your lawn mower has a primer bulb, press it several times to prime the engine.
-
Start the Engine
Attempt to start the engine. If it doesn’t start immediately, give it a few tries. Once started, let the engine run for a few minutes to ensure smooth operation.
-
Adjust the Carburetor if Necessary
If the engine doesn’t run smoothly or idles poorly, you may need to adjust the carburetor settings. Refer to your mower’s manual for guidance on carburetor adjustments.
Conclusion
Regularly cleaning the carburetor on your Craftsman lawn mower is a simple yet effective way to maintain optimal performance. By following this step-by-step guide, you can ensure that your mower’s carburetor remains free of debris and operates smoothly, contributing to a healthy and well-maintained lawn care tool.
Remember to consult your mower’s manual for specific instructions and recommendations tailored to your Craftsman model. With a clean carburetor, you’ll enjoy efficient lawn mowing and extend the overall lifespan of your trusty Craftsman mower.


